Sunday 28 November 2010

I AM a foodie

Dear all,

Although my blog is called [I'm a Foodie], which means a love of all foods, I have focused on baking until now. However, recently I have made a couple of nice dinners as part of dinner parties for friends, and some of them I just have to share with you (because I'm proud of them!). So every now and then, if I make something yummy, I will post these dishes on Sunday evening, to inspire a good start of the week. Enjoy!

First up: Spicy rice and zingy coconut chicken


Spicy rice: fried up with onion, garlic and some curry paste. Added: chickpeas, spinach, handful of raisins and cashew nuts.

Zingy coconut chicken: marinated overnight in lime, curry powder, bit of chilli powder and seasoning. Right before going in the oven I rolled the bits of chicken in some desiccated coconut. Then I sprayed it with a bit of oil and cooked in the oven.

For serving: I added a dollop of greek yoghurt to the rice to give it a bit of freshness.

Boy was this good food! I have another couple of portions in the freezer to take with me for lunch too - excellent!!

xoxo Jennifer

Wednesday 17 November 2010

Castle Cake

Dear all,

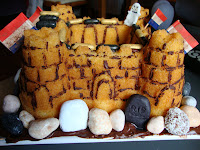
Since it has become well known that I like to bake, people have started showering me in baking-related presents, for which I am eternally grateful. Some of these presents come in the form of fancy baking tins, such as the angel shaped tin last week. This week, however, I would like to present to you: CASTLE CAKE!! This awesome baking tin was a present as well, and I in fact made it in honour of the birthday of one of the people who gave it to me.

For the cake itself I decided to follow the recipe that came with the tin, just to see how it would turn out. This recipe was for coconut pound cake, quite delicious!


As for the decoration, I was a little Halloween inspired, as my friend's birthday was actually the 30th of October, right before Halloween. With sugar paste I made a couple of decorations myself: 2 tomb stones, an axe, a cross, a ghost and 2 skulls. The rest of the decoration I actually bought in Scotland, including chocolate rocks, gold and black decorations and coconut mushrooms.


As the cake shape hadn't come out as clearly as I wanted, I had to find a way to accentuate the finer details of the castle cake. I had made a cocoa paste (water + unsweetened cococa powder) which I covered the edge of the plate with to stick all the rocks etc. on. With the same paste and a toothpick I started filling in the grooves on the cake to accentuate the stone pattern etc. And this is what the cake ended up looking like:


And here's a quick look at what the cake looks like cut in half - with my friend's rather large portion!! (Always a good sign I guess?!)


This was another one of those cakes I had an absolute blast making and was the perfectly delicious ending to a wonderful evening.

Until next week! (for which I still have to come up with something, hehe)

xoxo Jennifer

Wednesday 10 November 2010

Angel Cake

Dear all,

A cake that has been on my wish list for a while is the British version of an Angel cake (not to be confused with angel food cake which is the American version and quite different). When my mum gave me an angel-shaped cake tin I just couldn't resist, so here it goes!

Angel cake uses lots of egg whites and no flour, so it's quite an interesting cake to try out (and perfect to make along side the key lime pie that only uses egg yolks ;) ). So first up was whipping the egg whites into shape:


The egg whites need whipping until they almost have a whipped cream texture then you add the rest of the ingredients. I used 2 cake tins to make this cake, one the angel shaped one and a simple round one to form the base of the cake.


I decorated the round cake with white chocolate, eadable glitter and some shiny sugar decorations.


As for the cake colour, as you only use egg whites the cake turns out very white. Angel cake, however, is usually a mix of white, yellow and pink cake, so that's what I did!! I left the angel white, and added food colouring to the cake mix for the round cake, yes, yellow and pink. So the angel on top was white, then a layer of pink, and yellow at the bottom. Which is exactly right according to Wikipedia:

"Angel cake is called angel cake because it has three layers and is pink in the middle. All angels look like this when cooked correctly."


Unfortunately this part was removed shortly after I discovered it, so you'll just have to take my word for it. And you know I'm not witty enough to come up with that myself!


And so here it is, a before and after picture, of my angel cake, Rafaƫl.


And with this post I complete my back log of cake posts - I better get baking for next week!!

xoxo Jennifer

Wednesday 3 November 2010

Pear and Chocolate Pie

Dear all,

Today I have a post with plenty of pictures for you! For a 'girls' night' recently hosted at my friend Roxy's, I made a pear and chocolate pie (to continue the autumn theme I started last week). BIG success!!

The pie has a simple shortbread pie crust. The next step was to grate a whole bar of chocolate (I was absolutely covered in chocolate I can tell you! Lots of finger-licking going on when I was done ;) ) which then goes into the pie first. See for yourself!


Next I halved and peeled 3 pears and removed the core (not an easy task when you can only halve the pears, not quarter them!). I then sliced them quite thinly, making sure to keep the shape of the half-pear. This was for the next step, placing the sliced pear halves on top of the chocolate to form something that resembles spokes of a wheel (as described in the recipe).


As it turned out I apparently had big fat pears, so instead of 6 spokes I only had five (leaving me with half a pear to munch on while the pie was in the oven, yum!). I then ladled some custard (mix of egg yolk, egg and cream) over the pears and then sprinkled the whole lot with caster sugar.


Tadaa, chocolate and pear pie! With a nice golden brown custard and slightly caramelised pears, it sure looked good! One of the girls brought some autumn decorations, looked amazing with the pie! And our host sure was happy!


Finally, here are some pictures of the yummy slices of pie we munched on. Now tell me that doesn't look good!!!


The recipe actually recommended serving the pie warm, which I would definitely like to try next time. I can imagine that the goo-yness of the warm chocolate mixed with the custard can be absolutely heavenly. Definitely worth trying again!

xoxo

Jennifer